If you've ever wanted to create wood carved caricatures, you've come to the right place. Here you'll learn about the designs, techniques, and safety. It is possible to transform a basic caricature into something extraordinary. You don't have to know where to begin if you aren't sure how to get started. Here are some tips for making your caricature stand out. Besides, there's always the option to take classes from caricaturists.
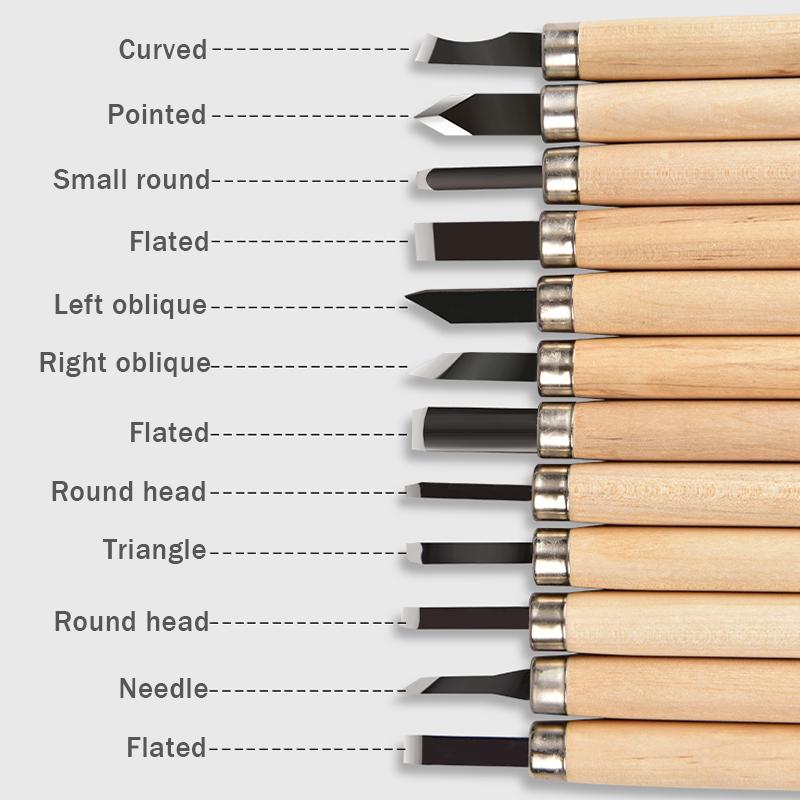
Techniques
Wood carving caricatures is a rare form of sculpture. They are amusing and can tell stories without the need for words. Caricature refers to a distorted representation of a human being. Dave Stetson is one of the best wood carvers. He adheres to a strict code for realism. There are certain rules you should follow to create an effective caricature. This article will cover the basics of caricature-carving and give tips for creating one.
First, it requires great focus when carving an astronaut. Carving an astronaut requires using spoon carving knives or whittling knives, which are both delicate tools. You can also use templates to help you make your work easier while carving the astronaut. Finally, a good tutorial will provide step-by-step instructions on how to finish your caricature. You may want to consider purchasing a tutorial for this topic if your budget is tight.
Designs
There are many ways to create amusing wood carved caricatures. Using a pattern is a great way to start. You can also purchase a cardboard cutout and use the same patterns for carving different types of caricatures. You can also use the tutorial to carve a caricature. This article will help you learn about the best techniques and designs for carving a caricature.
Fred's first caricature was called "Aristocrats of the Roads". It depicted two men-wanderers. It was made of Honduras Mahogany. Fred entered it in competitions, winning several awards. It was also featured in the Chipping Away Catalog. In 2009, Fred carved another caricature of Luciano Pavarotti, which won him a Second Runner Up Award at a national woodcarving convention.
Eyes
When carving caricatures, one of the most important things you should learn is how to ensure that the eyes look real. Although it is fine to have realistic looking eyes, the lack of enough detail can cause viewers to be dissatisfied. You can make sure your eyes are perfectly symmetrical by taking a photo of an existing carving. Follow the steps in the photo.
Next, determine the shape of your eyes before carving them. Some carvers use the exact same eye shape, while others may use a different one. Others use different shapes to create more believable eyes. To make your eyes symmetrical, you can use stop cuts to carve the lower eyelid. Lastly, you will need to carve the pupil and the iris. After you have completed these details, you can move on to carving the caricature.
Safety
Wood carving caricatures are unique in their designs. They are capable of telling a story without using words. Their creators take great care to ensure that their work is accurate. Caricatures can be described as representations of people and things that are exaggerated in order to convey an impression or satire. Wood carving carver Dave Stetson has established strict rules for carver safety and quality, as well as providing information for consumers.
First, clean the wood thoroughly and remove pencil marks. Use dish soap or water to clean the surface. To carve the neck and head, use a V-shaped 60 degree tool. A 60-degree V-shaped tool can be helpful in the carving process, as it cuts wood very easily. The Ramelson 60 degree V-shaped carver tool is a good choice. It is both sharp and simple to use.
Materials
You can create animal caricatures with wire and wood if you're looking for a challenging and fun way to carve animals. While animal caricatures may not be as elaborate as human caricatures, they are still fun and can convey a story without the use of words. Caricatures have a heightened sense of reality. For beginners, carving caricatures can be difficult. However, for more skilled carvers, there are many materials available.
For carving, you will need chisels along with a wooden board. You will also need a hammer. The first layer of paint is acrylic white paint, which you can buy at a craft store. Once you've completed the base layer, the next layer can be started. This layer will contain a mixture of a golden brown and a few drops or burnt sienna. For the face, you should use 2 drops of sunkissed peach.
FAQ
What are the basics of woodworking?
A great way to start learning how to build furniture is by building a simple bench for yourself. You can use any wood you have in your home to complete this project. If you are unsure what type of wood is best, you can get cheap pine boards at Lowes (or Home Depot) instead. After you've constructed your bench you'll want sand all the rough edges off and varnish it.
Where can I get free woodworking plans?
Free woodworking plans are available online. You don't even need to buy books or magazines. All you need to do is search Google. Just enter "free woodworking" into the search bar, and you'll see hundreds of websites where you can download free plans.
How long does it take to finish a piece of furniture?
It depends on the size and condition of the furniture. For smaller projects such as picture frames and boxes, it can take less than a day to complete. Larger projects like dining tables and desks require several days. It takes time to stain and seal the wood properly.
How do I organize my shop?
Setting aside an area to store tools is the first step in keeping your workshop organized. Make sure your tools are clean and free of debris and dust so they can be used properly. Use pegboard hooks to hang tools and accessories.
Statistics
- Overall employment of woodworkers is projected to grow 8 percent from 2020 to 2030, about as fast as the average for all occupations. (bls.gov)
- Average lumber prices rose about 600 percent between April 2020 and May 2021. (familyhandyman.com)
- Woodworkers on the lower end of that spectrum, the bottom 10% to be exact, make roughly $24,000 a year, while the top 10% makes $108,000. (zippia.com)
- In 2014, there were just over 237,000 jobs for all woodworkers, with other wood product manufacturing employing 23 percent; wood kitchen cabinets and countertop manufacturing employing 21 percent. (theartcareerproject.com)
External Links
How To
How to join wooden boards without using nails
Woodworking is a hobby that many people enjoy doing. Woodworking is a relaxing hobby that allows you to use your hands to create useful things from wood. You might want to join two pieces from the same wood, but you don't need to use nails. This article will teach you how to do this to keep your woodwork projects looking great.
First, remove any sharp edges from the wood pieces before you join them. You don't want any sharp corners to cause problems later. After you have completed this step, you are ready to glue your boards together.
When working with hardwood, glue should be applied only to one side. Use glue on both the sides for softwoods, such as cedar or pine. Once the glue has dried, press the boards together until they are fully adhered. Before moving onto the next step, make sure the glue has dried completely.
After you glue your boards together, drill holes at the joints where screws will be inserted. Depending on the type of screw that you use, the size of these holes will vary. If you are going to use a half-inch wood screw, you will need to drill at least 3/4 inch deep.
After drilling your holes, drive the screws into the board's backside. Do not hit the boards' front surfaces. It will ruin the finish. Try to not hit the ends of the screws when driving the screws. This will prevent splitting the wood's end grain.
Now that your project is finished, you'll want to protect it from the elements. To do this, you can seal the entire furniture piece or just cover the top. You will want to choose a product that will be durable for many years. You can choose from oil-based varnishes or polyurethane, shellac and lacquer as examples.
These products can usually be found at any home improvement store. Just make sure that you buy the right kind for the job. Some finishes are toxic and should not ever be used indoors. So, always wear protective gear when handling them.