
Here are some patterns you can make with your scrollsaw. Scroll saw patterns do not have to be complicated as you might believe. There are two types, simple and advanced. Once you have learned how to cut scroll saw patterns, you will be able to move on with more complex projects. Tutorials for Backerboards as well as Blades will help you get going.
Simple patterns
Scroll saw carving is a difficult process for beginners. These simple patterns will help you create beautiful scroll saw items quickly and easily. You can design scroll saw patterns in many different ways, so you can make something unique for someone or for yourself. It is important to remember that the patterns should not be traced on wood by hand. Even the smallest movement could cause damage. You can print your patterns to avoid this. You will need a printer to print scroll saw patterns.
A template made from wood can be used to create ornaments for your house. Simple patterns for a scroll saw will help you practice on a simple pattern, while more complex patterns will require some advanced skills. A wooden switch topper, for example, can be a great addition to any living room. A wooden template can be used to create a simple Christmas tree. A scroll saw is a must, as well as a tabletop/worktop and a few hours.
After you have learned how to use a scroll saw to cut, you will be able create different shapes with it. You can use simple patterns to start a scroll saw, no matter how many pieces you have. There are many patterns for scrolling, and it's hard to know which one to choose. You will find them all over internet, including lists with the best scroll saws.
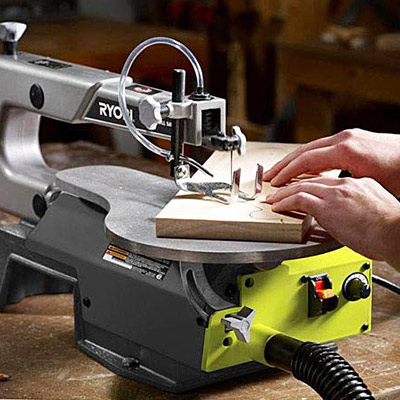
Backerboards
A good quality Baltic Birch plywood is recommended when creating your own scrollsaw backer board. These boards can be cut with your scrollsaw in thicknesses ranging from 1/8" (3mm), to 6mm. Spray-painted plywood or Plexiglass are also options if Baltic Birch plywood is not available. Regardless of the material you choose, make sure to read up on proper setup and maintenance techniques.

The first step is to make a solid backingboard. Then, you'll need to choose your blades. There are many sizes that you can choose from so make sure you have the right size. Your scroll saw blade can be protected from damage by using a quality backerboard. You should also consider the material used for your scrollsaw's table. These boards are affordable, but can prevent your scrollsaw's blade from catching on.
A scroll saw's accessory of choice is the backerboard. They help prevent splintering by preventing wood from bending during the cutting process. To ensure a smooth edge, the backer board can be sanded. To prevent splintering, you can also cut wood that isn't very strong. This guide will explain how to use the scroll saw to make wooden clocks inserts.
Blades
Scroll saw blades can be made in many different sizes. Most common are the spiral and crown tooth. The crown tooth blades are a pair of teeth that have the same side as the teeth. This makes them ideal for cutting smooth plastic. Spiral blades have a spiral shape that can be bent in any direction. They are great for cutting curves with tight radius corners and abrupt changes in direction. Scroll saw blades come in a variety materials such as steel, wax, and even wood.
The most commonly sold blade for a scroll saw is the standard-tooth. The distance between the teeth is equal. For the cutting effect, the blade's edge is ridged on only one side. This means that when you change the blade, one edge will face forward. A scroll saw blade can be a challenge to change without a tutorial. You will have a much more enjoyable woodworking experience if you follow these basic tips.
Scroll saw blades are designed to create intricate cuts in a variety of materials, including wood, metal, and plastic. Good alignment and tension are essential for this purpose. Finer blades are preferred for cutting hardwood. Thicker blades work better for metal materials. Make sure to buy the correct blade size and tension for your scroll saw to maximize its potential. This will allow you to ensure smooth cuts every time.
FAQ
What kind tools do carpenters use to build?
A hammer is probably the most widely used tool for carpenters. A hammer is useful for driving nails into wood. A hammer is used to hold pieces together during a project. Other tools include clamps and pliers, screwdrivers as well as measuring tape, pencils and saws.
How long does it take to finish a piece of furniture?
It depends on the type and complexity of your design as well as the amount of finishing that you use. Hardwoods are more difficult to maintain than softwoods. Hardwoods also tend to be more expensive than softwoods. But they last longer and resist moisture better. The average time it takes to finish furniture is one week to three weeks.
What woods are suitable for making furniture?
Woods are classified according to their hardness. Softwoods can be pine, fir or cedar. Because they are resistant to rot, softwoods are often used as outdoor furniture. Hardwoods include oak, maple, mahogany, and teak. They can't withstand the elements outside so they're best kept indoors.
What would be your first step in woodworking?
Start with softwoods, such as pine or poplar. After you are comfortable with the softwoods, move to hardwood.
How much will it cost to get started?
There are no exact numbers because every project is different. Here are some factors to help you estimate how much money you will need.
-
Material costs
-
Tools and equipment
-
Time spent on the project
-
Your hourly rate
-
How much profit can you anticipate to make
-
No matter if you are looking to hire someone
It's a good idea for beginners to start with small projects like frames and boxes. You will gain more experience and be able to tackle larger projects.
How do I organize my shop?
Setting aside an area to store tools is the first step in keeping your workshop organized. Keep your tools away from dust and debris, so they stay sharp and ready to work. Hang tools and accessories using pegboard hooks.
Statistics
- Average lumber prices rose about 600 percent between April 2020 and May 2021. (familyhandyman.com)
- Most woodworkers agree that lumber moisture needs to be under 10% for building furniture. (woodandshop.com)
- The best-paid 10 percent make $76,000, while the lowest-paid 10 percent make $34,000. (zippia.com)
- The U.S. Bureau of Labor Statistics (BLS) estimates that the number of jobs for woodworkers will decline by 4% between 2019 and 2029. (indeed.com)
External Links
How To
How to drive a nails in wood
To drive a nail into wood, the first step is to select the right size and type hammer. Claw hammers include mallets, claw hammers (sledgehammers), mallets, ball-peen hammers, hatchets, and mallets. Each type of tool has its advantages and drawbacks. A claw hammer is best for hitting nails or hard objects. However, it can be difficult to pinpoint exactly where the blow will land. A sledgehammer allows you to hit large areas simultaneously, but it is too heavy and cumbersome to use for small tasks.
Place your hand flat on the side of your chosen hammer so that the handle rests in your palm. Hold the handle in your hand, but don’t force it too hard that you break. Keep your wrist relaxed and the hammer straight up. Next, swing the hammer toward the ground and aim for the nail's center. The impact of the hammer hitting the nail should be felt. You can practice swinging the hammer with a block or wood until you feel the rhythm.
The hammer should be held close to your body when you are ready to begin driving the nail. You will need to position the nail so it is parallel to the wood. Keep your eyes focused directly on the tip of the nail. Swing the hammer forward, and then move the hammerhead. This can be repeated several times to increase the speed of your swing. When you are confident with the technique, add power to your swings. Try holding the hammer above your shoulder and bring it down forcefully. This will help you put more energy behind each of your moves.
Once you have made the first hole, remove your hammer. To pull out the remaining nails, use a screwdriver or pry bar. To prevent splitting the wood, ensure you keep the nail heads flush against the board's surface.