Scroll saws are a great tool for crafting, but if you don't know how to use them properly, you may end up frustrated. Learn the basics before buying your first scrollsaw. This article will help you choose the best blade, stack your pieces, and change out blades. By following these steps, you'll be well on your way to using your scroll saw to create the coolest things. If you have any questions, please don't hesitate to contact me.
Safety precautions
Safety precautions when using a scrollsaw are basic but important. To begin, make sure you wear safety glasses. Be sure to keep your hair trimmed and don't wear loose-fitting clothes. When operating the scroll saw, it is important to avoid jewelry and rings. Understand and follow the machine's controls and guards. Make sure the table is level, and that any surfaces around it are not slippery. Lastly, remember to use caution while operating the scroll saw.
A bench brush, which is one of the most popular safety tips for scrollsaws, is a good idea. A bench brush will keep the table and blade clean. The blade should be sharpened and secured. You can also purchase an aquarium air pump if you do not own a benchbrush. An aquarium air pump can be purchased relatively cheaply at a local pet store or garage sale. Keep scroll saw blades oiled to prevent rusting. The same applies to the blades: drywood will cause the blades to wear faster.
Choose a blade
It can be complicated to choose the right scrollsaw blade. There are however many factors you should take into account before you begin your first project. Many scroll saw users will want to try several blades before purchasing the correct one. There are two main types: pin-end and pinless. These types of blades are discussed in detail on the Scrollsaw Woodworking and Crafts forums. You can find helpful tips in the discussion forums of the Scrollsaw Woodworking and Crafts forums.

It's important that you consider the complexity of any pattern before purchasing a scrollsaw. A thinner blade is required for intricate patterns that are larger than smaller ones. A blade with smaller teeth is best for such cases. A thicker, narrower blade will work better in less complex patterns. For the right blade thickness, make sure to read the universal code.
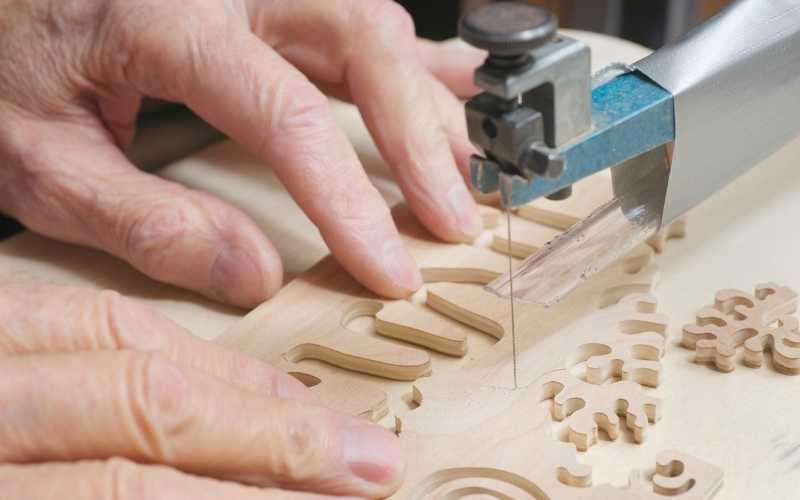
Changing blades
It is simple to change the blades on a scroll-saw, but it is important you read the instructions. These instructions can either be found in a scroll saw user manual or an online manual. These manuals may be downloaded free of charge. Before you start changing the blades on your scrollsaw, unplug it. Loosen the two screws on the blade mounts and then remove the old blade. After removing your old blade, you can tighten them and replace it.
First, remove your table insert. You should remove any safety equipment or guards that may be attached before you try to change the blade. The thumb screws are available to take off the blade mount that isn't removable. The blade is typically installed with the teeth facing down. There are blades that can have the teeth facing both directions. Always follow the directions in your scroll saw manual.
Stack cutting
Stack cutting is a common scroll saw technique that allows you to cut multiple layers of thin stock. Stack cutting involves wrapping each piece with tape and drilling holes in the stacks. This method results in multiple projects. The number of layers depends on the type of scroll saw and blade used, but it works well for simple ornament patterns. To cut multiple layers simultaneously, a router is an option for more complicated projects.
A constant tension scrollsaw is capable of turning an area slightly larger in size than the blade when cutting metals. It is impossible to cut perfectly square corners in one pass. You have two choices when cutting the outside corner: you can either cut across the stock or go in a completely different direction. This method results in a smooth edge and minimal sanding. A constant tension scroll saw can be used to cut outside corners but not sharply.
A scroll saw is used

Before using a scroll saw, you must know how to use it safely. This tool doesn't produce perfect cuts like a regular one. Instead, you should use it slowly and steadily. A good rule of thumb is to go slowly and split lines as you go. After you have finished cutting the material, take it out and clean the machine. Here are some safety tips for using a scrollsaw safely.
Make sure that the material you are using for the scrollsaw is suitable. Make sure your workpiece is large enough to accommodate the blade. You could end up damaging the blades if your workpiece is too small. If you're using the scrollsaw for cutting a pattern, general purpose spray glue can be used to attach the photocopy of the pattern to the wood. You must drill a hole into the workpiece if you want to cut straight lines using the scroll saw. This will ensure that the blades do not get stuck in the material.
FAQ
How can I organize my shop?
The first step toward keeping your workshop clean and organized is to set aside a designated area for storing tools. To keep your tools sharp and ready for work, keep them clean of dust and debris. You can hang tools and accessories with pegboard hooks.
Where can I buy hardwood lumber?
Home Depot offers hardwood lumber. You can find all types of wood products at Home Depot, such as flooring, cabinets and furniture.
You can also find a large selection of engineered hardwoods like Ipe (Araucaria Angustifolia), Brazilian Cherry, and Mahogany in their collection (Swietenia Macedonilla).
These woods can be found online by searching for "hardwood lumber" in Google.
Can I refinish furniture that I make?
Yes! There are many different ways to refinish older furniture without the need for professional help. Here are some ideas:
Use sandpaper for removing stains and scratches. Finally, use a clean cloth or sponge to clean the surface.
Apply clear polyurethane varnish. Allow to dry completely before moving furniture.
Acrylic paint is a great way to paint furniture.
Use stain instead of paint. Furniture will look richer with the stain.
Apply shellac wax. Wax will protect the wood and add shine.
What is the minimum investment a hobbyist needs to make in order to get started?
It is likely that you will need some capital in order to buy the required tools and supplies if your goal is to open your own woodworking business. It's a good idea to buy a small tablesaw, drill press and circular saw. These items are affordable so you won’t break the bank.
Which wooden products are most popular?
These wooden products are the most popular. They were made from sustainably harvested wood.
Oak, cherry and mahogany are the most sought-after wood types for furniture.
These woods have beautiful grain patterns and colors. They are also very strong. If they are well cared for, they can last many years.
To protect wooden furniture from moisture damage, you should paint it first. This includes all surfaces, including drawers, doors, and handles.
Paint that is water-resistant will ensure furniture lasts for a long time.
Followed by two coats, you should apply a quality oil-based primer. It is possible to apply multiple coats depending on how heavy the wear.
Avoid spray cans and aerosol paints. These products contain solvents that evaporate quickly and leave behind harmful fumes.
Can I succeed in woodworking if I'm a genius?
No. Woodworking is not difficult. To create stunning works of art, anyone can learn to use basic power tools.
Statistics
- In 2014, there were just over 237,000 jobs for all woodworkers, with other wood product manufacturing employing 23 percent; wood kitchen cabinets and countertop manufacturing employing 21 percent. (theartcareerproject.com)
- Average lumber prices rose about 600 percent between April 2020 and May 2021. (familyhandyman.com)
- Woodworkers on the lower end of that spectrum, the bottom 10% to be exact, make roughly $24,000 a year, while the top 10% makes $108,000. (zippia.com)
- The U.S. Bureau of Labor Statistics (BLS) estimates that the number of jobs for woodworkers will decline by 4% between 2019 and 2029. (indeed.com)
External Links
How To
How to stain wood
The process of staining wood involves the application of chemicals to the wood's surface, which causes it to change its color. This chemical reaction causes the wood to change from white to brownish red. The most common type of wood used for staining is oak, although many other types of wood can be stained.
There are several ways to apply stains to wood surfaces. Some methods involve mixing the stain with a solvent (such as turpentine) and then brushing or spraying the mixture onto the wood. You can also apply a solution containing water and dye directly to the wooden surface. Stains can also be mixed into paints and varnishes, becoming part of the finish coating.
Preparing the wood surface is the first step to staining it. To apply the stain, clean the wood completely. Sanding the wood smooths out rough spots and scratches. The next step is to determine the type of stain you would like to use. There are two main types of stain: non-penetrating and penetrating. Penetrating and non-penetrating wood stains penetrate deeper than other types, making them perfect for dark colors like mahogany. The best non-penetrating colors are those that work with light colors like maple.
After deciding on the type of stain, you want to apply, prepare your tools. The best tool for applying stains is a paintbrush. It allows you to evenly distribute the liquid over the surface. It is a good idea to have rags on hand in case you need them to clean up any stains that may remain after you have finished painting. If you plan on mixing the stain yourself make sure that you have enough containers to hold the different components.
Once you have prepared all your materials, it is time to clean the areas where you will stain the wood. Use soap and warm water to remove dust and grime. Use a dampened sponge and warm water to clean the entire piece. Take care to remove all debris and dirt, especially if you are planning on staining darker wood.
Apply the stain next. Begin at one end and spray or brush the stain on the wood. Slowly and carefully move along the grain of wood, slowly but steadily, until you reach the other end. The stain should not drip off of the wood's edge. Before you proceed with the next steps, let the stain dry completely.
Protect the painted surface with a coat polyurethane paint sealant. Three coats of polyurethane sealing agent are required. Allow the third coat of polyurethane sealer to dry overnight before applying the final coat.