
You might be curious about how texture can be added to your woodturning projects if you are a beginner. Ernie Conover shows how easy it is to add texture to woodturning projects. Textures can be natural patterns used to embellish objects in many different ways. You can add texture to your projects by adding them. There are many texture options available for your project.
Make a rolling-pin
You might be curious about how to make a rolling Pin if you have recently started woodturning. Wood rolling pins are generally long and made of wood that is free of defects throughout. You can use any type of hardwood depending on how long the pin is. However, hard maple, cherry or apple wood are the best for rolling pins. Ash, ash, or another similar hardwood, is also an option. You can find cheaper versions made from soft maple and birch. However, it's important that you choose the right wood to do the job.
To begin, measure the diameter of the handle and the diameter of the rolling pin. Use the Parting Tool to measure the diameter and then use the Roughing Gouge to skim down the handle length to its diameter. After sizing the diameter, use the Bowl Gouge to make the rolling pin's curves. This will allow to you to thread the pin. Once your rolling pin is dry, coat it with a food-safe varnish and let it dry for at least 15 minutes.
Making a salt-and-pepper shaker
These handy utensils can be made in many ways. A mason jar, for example, can be used to create a beautiful salt-and-pepper shaker. With a small nail, hammer and a pencil, make small holes around the letters. Leaving 5/8-inch of wood at the end, place a cork through the holes. Salt and pepper your shaker, and then enjoy the creation.
There might be a few Coca-Cola bottles in your house that you don't use. You can make a salt-and-pepper shaker from these bottles. To make the lines of the bottle clearer, you can either use tape or paint it with metallic leaf paint for a simple detail. Any colour of all-surface can be used.
Making a bottle stutter
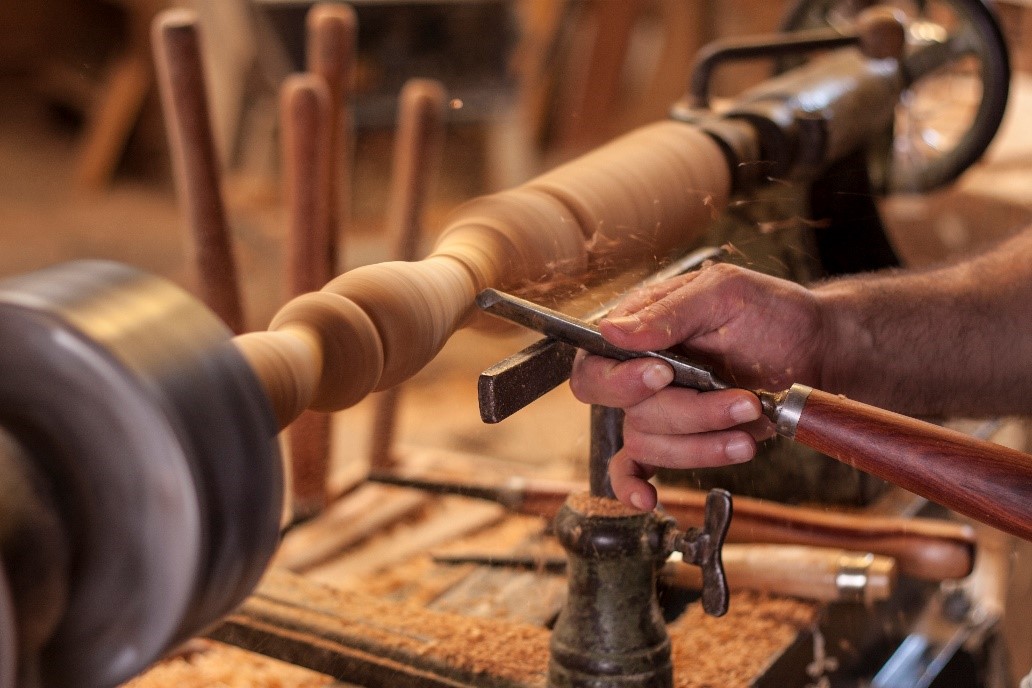
Making a bottle capper is easy with these steps. First, you must mount the blank between two centers. This will create a collet to mount in the chuck. Then, you will turn a piece to produce the desired shape. To attach the turned decorative part to the bottle, turn a threaded pin. You can use different sizes of threaded posts.
It is crucial to select the right type of wood before you begin the process. You can purchase blanks at a craft store. Most blanks will already be squared. But if you're cutting your wood by hand, make certain that the pieces are even and straight. If you are buying wood from a retail store, you might need to square it up. Otherwise, use a chop saw or tablesaw instead. If you have an odd-shaped piece, use a clamp to help you square up the wood. To finish the job, use a fine-grit to sandpaper.
Make a stacked ring box
A stacked ring bowl is a bowl that you create for woodworking by cutting multiple flat boards into concentric rings. Normally, the rings are glued together with a butt joint, but a sliding dovetail joint can add interest. The boards should measure five inches wide by one inch thick. The boards have been joined together and the edges of each board have also been planed.
You can cut a segmented ring bowl using a jig or trammel. The thickness of the board will determine the spacing of the segments and the number of layers necessary to achieve the desired height. One-inch thickness is recommended, but not thinner than 5/8'" or 3/4". To mark the band saw lines, you can use a trammel or circle-drawing tool.
FAQ
What wooden items sell well?
Most wooden items that are best-sellers are made from wood harvested sustainably.
Most furniture is made from oak, maple, mahogany or walnut.
These woods not only have great strength, but also beautiful patterns and colors. They can also last for years if they are properly cared for.
Wooden furniture should always be painted first to protect against moisture damage. This includes all surfaces, including drawers, doors, and handles.
Choose a paint with water resistance if you want furniture to last as long possible.
Use a high-quality, oil-based primer and two coats of topcoat. Depending on how often it will be worn, you may need to apply several coats.
Spray cans or aerosol paints should be avoided. These products contain solvents that evaporate quickly and leave behind harmful fumes.
What is the average time it takes to finish furniture?
It depends on the type of wood you choose, the complexity of the design, and the amount of finishing you apply. For example, hardwoods require more maintenance than softwoods. Hardwoods can also be more costly than softwoods. But they last longer and resist moisture better. It takes between one and three months to finish a piece.
What woods can be used to make furniture?
Woods are classified according to their hardness. Softwoods include cedar and pine as well as cedar and cedar. Because they are resistant, they can be used for outdoor furniture. The hardwoods include teak, maple, mahogany and oak. Because they are not weather-resistant, they are best used indoors.
What is the difference in a hobbyist and professional woodworker?
Hobbyists enjoy making things out of wood, whereas professionals focus more on the quality of their work. Hobbyists often take pride in the creations they make and often share them to family and friends. Professionals will spend hours researching designs before they begin working on a project. They'll be meticulous about every aspect of their work, from choosing the best materials to finishing it perfectly.
How can a woodworker start making money?
Many people are beginning to learn how build furniture to launch an online business. However, if you're just getting into furniture building, there are other options than selling on Etsy. You could also sell at craft fairs, or other local events. For those who want to build their own furniture, you might offer workshops. Consider offering your services if you have previous experience as a builder or carpenter.
How often do I need to buy new supplies
You will likely need to replace some tools over time. You'll need to sharpen your hand tools regularly if you use them. Power tools will require replacement parts every so often. Avoid buying too many products at once. Spread your purchases out over several months.
What kind tools do carpenters use to build?
A hammer is the most commonly used tool by carpenters. A hammer helps to carpenter pound nails into the wood. They can also use it to hold the pieces together as they work on a project. Other tools include clamps, pliers, screwdrivers, measuring tape, pencils, saws, drills, and wrenches.
Statistics
- If your lumber isn't as dry as you would like when you purchase it (over 22% in Glen Huey's opinion…probably over 10-15% in my opinion), then it's a good idea to let it acclimate to your workshop for a couple of weeks. (woodandshop.com)
- The best-paid 10 percent make $76,000, while the lowest-paid 10 percent make $34,000. (zippia.com)
- Woodworkers on the lower end of that spectrum, the bottom 10% to be exact, make roughly $24,000 a year, while the top 10% makes $108,000. (zippia.com)
- In 2014, there were just over 237,000 jobs for all woodworkers, with other wood product manufacturing employing 23 percent; wood kitchen cabinets and countertop manufacturing employing 21 percent. (theartcareerproject.com)
External Links
How To
Tips for driving a nail in wood
To drive a nail into wood, the first step is to select the right size and type hammer. The most popular types of hammers include claw hammers as well as mallets and ball peenhammers. Each type of hammer comes with its advantages and disadvantages. A clawhammer works best when hitting something hard like nails. However, it can sometimes be difficult to see exactly where the strike is going. A sledgehammer is useful for striking large areas at once but too heavy to be effective for smaller tasks.
Place your hand flat on the side of your chosen hammer so that the handle rests in your palm. Hold the handle in your hand, but don’t force it too hard that you break. Your wrist should be relaxed while you hold the hammer straight upwards. You should then swing the hammer straight up, keeping your wrist relaxed. You should feel the impact of your hammer hitting the nail. If you're having trouble getting the hang of swinging a hammer, practice with a block of wood until you get the rhythm down.
Once you are ready to drive the nail, place the hammer close to your body. You will need to position the nail so it is parallel to the wood. Keep your focus on the tip of each nail. Then, swing the hammer forward. Next, follow the motion of your hammerhead. Continue this motion several times, slowly increasing the speed of each swing. When you are confident with the technique, add power to your swings. To make it more powerful, hold the hammer up high to your shoulder and then bring it down. This will help you put more energy behind each of your moves.
Once you have successfully drilled the first hole in the nail, remove the hammer. To pull out the remaining nails, use a screwdriver or pry bar. Keep the nails heads in line with the surface of the board to prevent splitting the wood.