There are several options for woodcarving if this interests you. These patterns can be printed, making the entire process much easier. Beginning students can begin with geometric patterns. Once they get the hang of carving, they can move on to other patterns, like flowers and animals. This article will show you several woodcarving patterns. These are the top patterns that you can use for learning the art.
Fine Woodworking by Dremel: Detail Engraved Flower
The Detailed Engraved Flower from Finewoodworking by Dremel is a great option for crafting projects. These rotary tools, often referred to as Dremels, are the perfect tool for engraving and detailing. They are simple to operate. Just set the speed dial and press a button near the head of the unit. The speed dial controls how much material a tool can remove when carving a wood-surface.
Frank C. Russell detailed engraved flower
The book "Detailed Engraved Flower by Frank C. Russell" is available in print and online. While Russell's early output wasn't entirely documentary, a lot of it was based upon first-hand observation. His later works combine secondhand and fictionalized information. These works, however, are representations of a part myth and part reality, with no definitive proof that the narrator is correct.
"Detailed Engraved Flower by Frank C, Russell," one of his earliest works, is a vivid example of the artist's skill. This tiny work, which dates back to 1911, is made of an ivory grip and a bull's skull. The image measures just a few millimeters. This work of art was created in memory of his mother, who had already died.
Tumbled Rose: Detail Engraved Floral
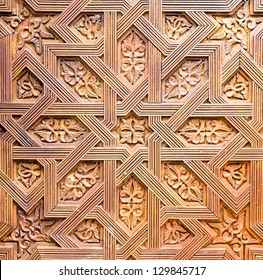
Tumbling rose's detailed engraved flower is a gorgeous wood carving. Although it looks simple, this flower actually has intricate petals. This flower is a great project for novice carvers because of its intricate details. Although the photos show only a few parts of the engraved rose, you might be able find some pieces that work better than others. Tumbled Rose's detailed engraving flowers come in many sizes.
FAQ
Can I refinish my own furniture?
Yes! There are plenty of ways to refinish old pieces of furniture without having to pay a pro. Here are a few ideas:
Use sandpaper on the surface to remove any stains or scratches. Then wipe down the surface with a clean cloth.
Apply clear polyurethane varnish. Before moving furniture, let dry completely.
Paint furniture with acrylic paint.
Instead of painting, use stain. Furniture will look richer with the stain.
Use shellac wax. The wax will add shine to the wood and protect it.
Where can I get free woodworking plans?
You don't need to purchase any books or magazines to find free woodworking plans. You only need to Google search. Search Google for "free woodworking" to see hundreds of sites that provide free plans.
What kind of wood should you use?
Woodworking is a popular job that involves oak, pine and maple. Each type of wood has unique characteristics that affect the look and feel of the final product. For example, oak tends to be darker and harder than other woods. Birch is lightweight and soft while mahogany is heavier and denser. You can also choose between solid wood and veneers. Veneers are thin wood sheets that are glued together to form one layer.
Which material would you recommend for woodworking lessons?
Start with softwoods, such as pine or poplar. You will feel more comfortable with these softwoods, so you can move onto hardwood.
Statistics
- Most woodworkers agree that lumber moisture needs to be under 10% for building furniture. (woodandshop.com)
- The best-paid 10 percent make $76,000, while the lowest-paid 10 percent make $34,000. (zippia.com)
- Woodworkers on the lower end of that spectrum, the bottom 10% to be exact, make roughly $24,000 a year, while the top 10% makes $108,000. (zippia.com)
- Overall employment of woodworkers is projected to grow 8 percent from 2020 to 2030, about as fast as the average for all occupations. (bls.gov)
External Links
How To
How to stain wood
The process of staining wood involves the application of chemicals to the wood's surface, which causes it to change its color. This chemical reaction changes the wood's color from white to brownish. While oak is the most widely used type of wood for staining purposes, other types of wood are also available.
There are many ways to stain wood surfaces. You can mix the stain with a solvent, such as turpentine, and spray it onto the wood. Others use a solution made up of water and dye, which is then applied directly onto the wood. You can mix stains into varnishes or paints to make them part of your finish coat.
Preparing the surface for staining wood is the first step. Cleaning the wood thoroughly removes any dirt or grease that could interfere with applying the stain. Sanding smoothens any scratches or rough spots. You must then decide on the type of stain that you wish to use. There are two basic kinds of stains: penetrating stains and non-penetrating stains. Penetrating colors penetrate deeper into wood than those that are non-penetrating. This makes them more suitable for darker colors, such as mahogany. Non-penetrating stains work best with light colors like maple.
Once you have decided on the stain type that you want, get your tools ready. A paintbrush works well for applying stains because it allows you to spread the liquid evenly across the surface. A few rags are also handy to clean up any spillages after you have finished painting. If you intend to mix the stain yourself you will need enough containers to hold all the components.
After you have prepared the materials, you can clean the area where you want to stain the wood. To remove dirt and dust, use warm water and soap. Wipe down all furniture pieces with a dampened cloth and clean water. Make sure you eliminate any loose debris, especially if you plan to stain darker wood.
Apply the stain. Apply the stain by brushing or spraying it onto one side of the furniture. Slowly and carefully move along the grain of wood, slowly but steadily, until you reach the other end. The stain should not drip off of the wood's edge. Before proceeding to the next step, let the stain dry thoroughly.
A coat of clear polyurethane sealing agent is applied to protect the paint. Three coats of polyurethane sealing agent are required. Allow the third coat, which should dry overnight, to dry before sanding.