A template will assist you in positioning your patterns on the wooden surface. It will also give you reference points to use when drawing on wood. You can use a template to make repeat pieces. It can be saved to save for future projects. You must first prepare your template. Find out how to create it. Here are some useful tips for creating a template for wood carving. Now you can start to make your patterns on the wooden surface!
Woodcarving lessons for beginners
A chess-pawn is a fantastic beginner woodcarving tool. The pawn's rounded edges mean that the head needs to be shaped with more precision. The pawn can be worked on until it is the right shape. This is especially important if you are a beginner. You need 16 identical pieces. This course will help you learn how to create curves and balance your pieces.
Different types of wood may require different techniques depending upon your abilities and the materials that you have. Some woods require more advanced tools, while others are simpler to carve. It is important to use the right tools for your project. A dull tool can make it more difficult and dangerous for the wood. For beginners, it is best to start with soft woods like balsa and birch.
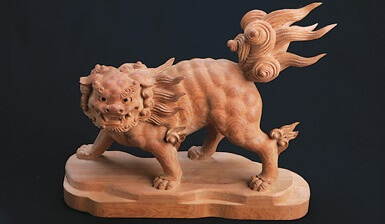
3d wood carving patterns
3D wood carving patterns are a great choice for beginners. This pattern is great for carving full-sized bird figures. You should start out with a larger piece of lumber if you are just starting to carve 3D designs. This will allow you to swap knives less often. You can also carve bears, either as a cartoon or as a real one.
Burly and round, the bear is an easy animal for carvers. Make a 360-degree carving of the bear and use a reference picture to show the main shapes. After you are confident with this technique, you can either use a CNC machine to carve the bear or do it manually. You can create something new with this pattern in either way. This pattern is a great way for you to learn how to carve, and to create art that will last a lifetime.
Dongyang wood carving
Dongyang wood carving is an ancient Chinese art form that has evolved into a unique category. The Taihe year was the first time this art form appeared. The legend of the white snake is also often referenced when carving Dongyang wood. This type of carving is extremely detailed, as the name suggests. Hence, these works are often more expensive than other types of wood carvings.
Dongyang wood carvings can be used to decorate almost any wooden surface. These works can be displayed in both private and public spaces. A piece called "The Legend of the White Snake" is a popular example. This story tells of an immortal snake falling in love with young women. He was placed under the Leifeng Pagoda. However, he was freed after the pagoda collapsed.
Whittling flower
A whittling project is a great choice for beginners in wood carving. This beautiful flower can be carved in many ways, each one equally rewarding. Draw the petals to get an idea for the shape and proportions. Transfer that design onto the wood chunk. This will allow you to visualize the final shape and remove any unnecessary pieces. It also makes carving much easier.
You will need special tools to carve flowers. A gouge is useful for cutting the petals and background of the flower. A gouge can also be used to trim the stems, redrawing them along the way. To carve intricate details, you can also use a Dremel to cut the stems. You can change the blade of your carving tool to create different shapes and accessories.
Wooden ARO
Aro's wooden ARO drawings make a great way to collect his works. These artists were keen to preserve traditions and create works from old items. For example, in 1975, Aro turned a warped tabletop into a wooden relief, Leipaenkeli, which means bread angel in Finnish. It is made of a simple material but contains many messages about traditional value. You can read his biography to learn more.
STEAM-based multidisciplinary production helps students create a unique artwork for public display. Many students choose to work with an established regional or international artist or select a project that showcases the talents and passions one student. The mentor is someone who has succeeded in the chosen field of study and helps students to focus on their own path. The program is tailored to students who are disadvantaged and often includes community involvement.
Wooden Cragg
Woodcarvers of all levels are creating stunning pieces of art using this craft. One popular technique is 'Pierced Relief', which involves carving a whole piece of wood using a single block. Another artist uses this method to create abstract pieces which are less abstract but still retain the details of their original pieces. Remy Clemente, Morgan Maccari and Morgan Maccari both from France depict a series made of wood frames that have been melted into a metallic frame.
Beginners can start by making simple geometric patterns. You can then develop the skills necessary to carve more complicated designs. Printing out drawings of your designs can help you get a feel for it. You can practice by making wooden carving drawings. You should carefully follow all instructions. You will have a lot more success carving wood than you think. There are many options for designs, such as flowers, fruits, or animals.
FAQ
How do I know what type of wood I'm dealing with?
Always read the label when purchasing wood. The label should detail the wood species, its moisture content and whether it has been treated or not.
How do you calculate woodworking prices?
The most important thing to remember when calculating costs for any project is to keep them as low as possible. Always make sure you get the best price on materials. It's also worth taking into account all the other factors that may affect the cost of your projects, such as time, skill level, and experience. If you want to get an idea of what you can expect to spend on different types of woodwork projects, check out our guide to the average price of common household DIY tasks.
Are you able to teach yourself woodworking
Doing is the best way to learn any subject. Woodworking requires patience, practice and skill. It takes time to master any craft.
You can learn the most effective way to master a skill is by actually doing it. Start small and use what you learn.
Can I make a living doing this?
Yes! In fact, many woodworkers already do. According to the U.S. Bureau of Labor Statistics (BLS), the median annual wage for woodworkers was $34,000 in May 2012. This is much higher than the national median of $31,000 per annum.
Where to Buy Hardwood Lumber?
You can buy hardwood lumber at Home Depot. You will find a range of wood products available at Home Depot.
There is also a wide selection of engineered hardwoods, including Ipe (Araucaria Angustifolia), Brazilian Cherry(Pau d'Arco), Mahogany (Swietenia Mcrophylla).
These woods can also be purchased online by simply searching Google for "hardwood timber"
Statistics
- Most woodworkers agree that lumber moisture needs to be under 10% for building furniture. (woodandshop.com)
- If your lumber isn't as dry as you would like when you purchase it (over 22% in Glen Huey's opinion…probably over 10-15% in my opinion), then it's a good idea to let it acclimate to your workshop for a couple of weeks. (woodandshop.com)
- The best-paid 10 percent make $76,000, while the lowest-paid 10 percent make $34,000. (zippia.com)
- Woodworkers on the lower end of that spectrum, the bottom 10% to be exact, make roughly $24,000 a year, while the top 10% makes $108,000. (zippia.com)
External Links
How To
How to stain wooden surfaces
The process of staining wood involves the application of chemicals to the wood's surface, which causes it to change its color. The wood will turn from white to brownish-red due to the chemical reaction. Oak is the most commonly used wood for staining, but other woods can also be stained.
There are several ways to apply stains to wood surfaces. One method involves mixing the stain and a solvent and then spraying it on the wood. Other methods use a solution of water and dye applied directly to the wood. It is possible to mix stain into varnishes and paints, making it part of the finishing coat.
Preparing the wood surface is the first step to staining it. You must clean the wood well to remove any grease or dirt that might interfere with the application of the stain. Sanding can smoothen out scratches and uneven spots. Then you must decide what kind of stain you want to use. There are two main kinds of stains available: non-penetrating stains and penetrating. Penetrating stain penetrates deeper into wood than nonpenetrating, making them suitable for dark colors like mahogany. Non-penetrating oils work best when used with light colors, like maple.
After you've decided what type of stain to apply, get ready for your tools. You can use a paintbrush to apply stains. This allows you spread the liquid evenly over the surface. You should also have some handy rags to wipe up excess stains after you finish painting. If you plan on mixing the stain yourself make sure that you have enough containers to hold the different components.
After you have prepared your materials for staining, clean the area. You can remove grime and dirt with warm water and soap. Use a dampened sponge and warm water to clean the entire piece. Be sure to get rid of all loose material, especially if staining is planned for darker wood.
The stain should be applied next. Apply the stain by brushing or spraying it onto one side of the furniture. Move slowly and carefully along the grain of your wood until you reach its opposite end. Be careful not to let the stain drip off the wood's edge. Allow the stain to dry completely before you move on to the next step.
To protect the painted surface, apply a coat of clear polyurethane sealant. Three coats are recommended for polyurethane. Allow the third coat to dry overnight before sanding the final coat.