There are a few steps you should follow when installing a faceplate. These steps include selecting the right dimensions, screw diameter, and material. Once you have these details down, it is time for your faceplate to be installed. Continue reading to learn more about how to put your face plate in place. It will be easy to install and will help your lathe function as expected. These are the steps required to install a faceplate.
Dimensions
The faceplate, a primitive accessory, can hold any shape very accurately. In addition to wood, face plates can be made from light alloys or temporary materials. These faceplates can be used for temporary purposes or to hold difficult jobs. Wood screws can be used to attach the workpiece to a wooden faceplate. This arrangement is more popular for industrial lathes that home workshops.
It is crucial to know the dimensions of your faceplate. The faceplate should be the same size as the blank you are working on. If you intend on using the faceplate for different purposes, be sure that the screws won't conflict with one another. A hole is provided for a wrench. A slot for a tommybar or a wrench should be included. The faceplate is accessible for each tool.
Material
A face plate for a lathe is made of various materials, including aluminum, cast iron, steel, and welded structures. It is important to take into account the properties and materials of various materials when designing a plate. Below are some considerations to make when selecting a faceplate material. To ensure durability and accuracy in design, you must consider the material properties. For cost optimization, it is also important to consider the materials that will be used on a faceplate.
A lathe faceplate is made of polymeric material. It has a cylindrical shape. It usually has indicia marks and a planar front. There are also recesses for the workpiece to be chuck. Some faceplates come with fasteners that are located in inserts that are a contrasting color. This serves to warn the user if a fastener gets loose.
Screw size

Consider using a smaller screw size if you have a wood lathe. This is because your screw size will determine the amount of space available for the threads of your screws. If your screw diameter is larger, it will protrude past the faceplate and cause damage to its wood bowl. A slightly concave faceplate may be an option depending on the size of your lathe.
Faceplates are available as a variety sizes and in different materials. The smaller versions are made of alloy, while the larger ones are made of steel. The alloy faces can become worn over time, causing dangerous situations before they are discovered. Similarly, experienced turners understand how to mount their blanks to prevent them from becoming too loose and preventing them from being turned. Beginners, on the other hand, may use tools too close or try to turn a blank that is too large for their tools.
Installation
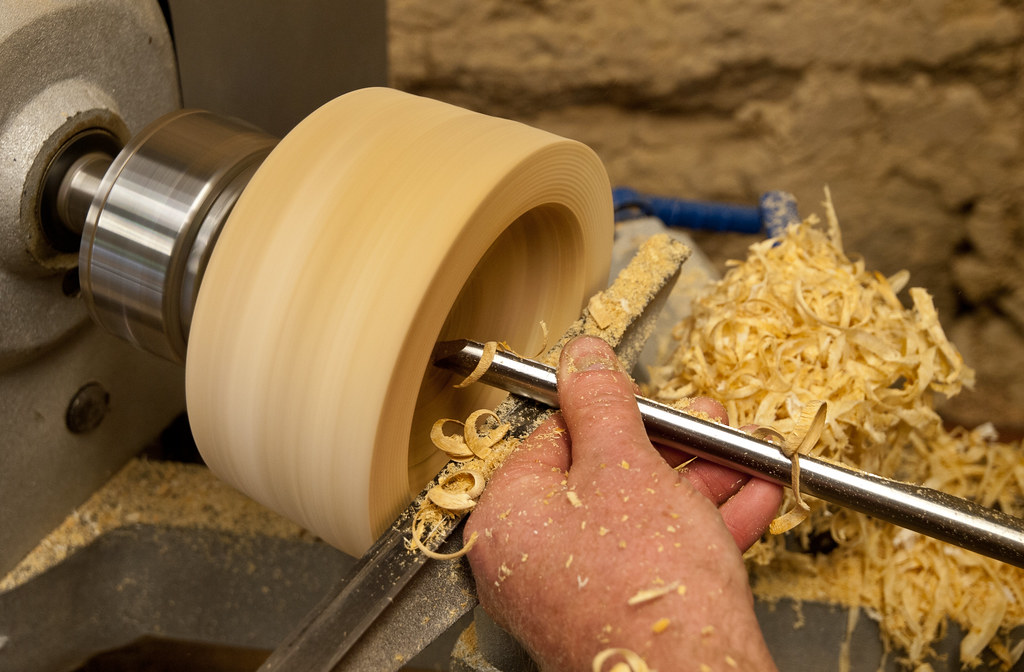
Before mounting the faceplate on the lathe, disconnect the power supply. Next, mount the faceplate on the workpiece. To turn the faceplate clockwise, turn the spindle counterclockwise. Once the faceplate in position, engage its spindle lock. Then turn the faceplate clockwise until the spindle turns freely. The spindle lock can be disengaged by turning counterclockwise on the lathe until the faceplate is removed.
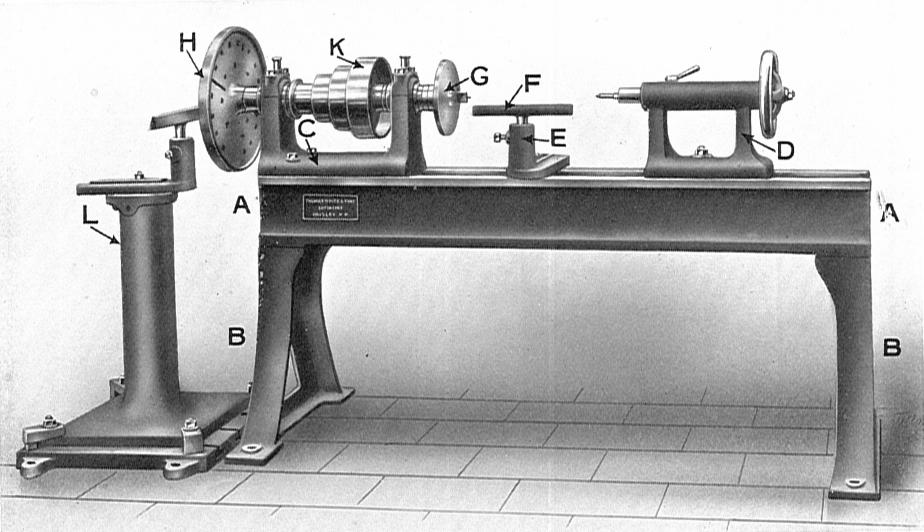
A faceplate can be described as a flat, round, and threaded plate located on the front end of a lathe. The slotted surface can accept clamps and any other fastening device. After the workpiece has been placed on the faceplate it can be secured by either sliding the clamps into the slots or directly screwing them into the threads of the faceplate. Once the workpiece was in position, the faceplate should be attached to the spindle.
FAQ
How often should I purchase new supplies?
You'll probably have to replace some of your tools over time. If you're using hand tools, you'll need to sharpen them regularly. For power tools, replacement parts will be required frequently. To avoid buying too much at once, try to spread your purchases out over a few months.
What time does it take for furniture to be finished?
It depends on the size and condition of the furniture. Boxes and picture frames are small projects that can be completed in one day. Larger projects such as tables and desks can take several days to complete. It takes time for the wood to be stained and sealed properly.
What tools do I need to start as a woodworker and what should I learn?
Woodworking requires patience and practice. It takes time and practice to master the various techniques and tools required for woodworking.
There are many types of woodworking equipment on the market today. Some prefer power tools while some prefer hand tools.
While you have the option to pick what you like, it is essential that you get the right tool for the job. You might start with a simple set of tools if you don't have much experience.
A router is a tool that cuts intricate shapes in wood. You can also learn how to use it. These routers can be purchased at most hardware and home improvement stores.
Statistics
- In 2014, there were just over 237,000 jobs for all woodworkers, with other wood product manufacturing employing 23 percent; wood kitchen cabinets and countertop manufacturing employing 21 percent. (theartcareerproject.com)
- Overall employment of woodworkers is projected to grow 8 percent from 2020 to 2030, about as fast as the average for all occupations. (bls.gov)
- Woodworkers on the lower end of that spectrum, the bottom 10% to be exact, make roughly $24,000 a year, while the top 10% makes $108,000. (zippia.com)
- Average lumber prices rose about 600 percent between April 2020 and May 2021. (familyhandyman.com)
External Links
How To
How to stain wood
Staining wood refers to applying chemicals to wood's surface. This chemical reaction causes the wood to change in color. This chemical reaction causes the wood color to change from white and brownish red. Oak is the most commonly used wood for staining, but other woods can also be stained.
There are many ways to stain wood surfaces. You can mix the stain with a solvent, such as turpentine, and spray it onto the wood. Some methods involve a mixture of water and dye that is applied directly to the wood. You can also mix stains with varnishes or paints so that they become part the finish coating.
Preparing the wood surface is the first step to staining it. You must clean the wood well to remove any grease or dirt that might interfere with the application of the stain. Sanding can smoothen out scratches and uneven spots. Then you must decide what kind of stain you want to use. There are two types of stains that can be used: penetrating and non-penetrating. Penetrating stains penetrate deeper than non-penetrating stains, which makes them great for dark colors like mahogany. Light colors such as maple work well with non-penetrating stain.
After you've decided what type of stain to apply, get ready for your tools. You can use a paintbrush to apply stains. This allows you spread the liquid evenly over the surface. After you're done painting, make sure to have some rags handy to remove any excess stain. If you are planning to mix your stain, ensure you have enough containers for each component.
Once you have prepared your materials, start by cleaning the area where you plan to stain the wood. To remove dirt and dust, use warm water and soap. Use a dampened sponge and warm water to clean the entire piece. You should remove any debris, especially if your plan is to stain darker wood.
Next, apply the stain. Begin at one end and spray or brush the stain on the wood. Work slowly and carefully, moving back and forth along the grain of the wood until you reach the opposite end. The stain should not drip off of the wood's edge. Allow the stain to dry completely before you move on to the next step.
To protect the painted surface, apply a coat of clear polyurethane sealant. Apply three coats with polyurethane. Allow the third coat, which should dry overnight, to dry before sanding.